Rainbow Dash Cupcakes 云宝纸杯蛋糕

you can’t have a party without a cake and kids need something fun to do at the party. Why not find a way to combine the two and save some money? Bake the cupcakes by yourself then let the kids decorate and create their own cupcakes.

Makes about 24 cupcakes,

  • 250g          cake flour 低筋面粉 (all-purpose or plain flour works. it just doesn’t produce a cupcake as soft as cake flour)
  • ½ teaspoon    salt
  • 2 teaspoons    baking powder 泡打粉
  • 4-5 large eggs   room temperature
  • 200g          caster sugar白砂糖
  • 200g          unsalted butter (melted)
  • 2 tablespoons   whole milk, room temperature 全脂牛奶 (室温)
  • 1 teaspoon     vanilla essence (optional)

Method

  1. Preheat the oven to 190℃ or375°F.  Line a cupcake/muffin pan with cupcake liners. In the meantime, melt the unsalted butter in microwave or on the stove and cool it off.
  2. In a medium bowl, whisk together cake flour, baking powder and salt. Set flour mix aside.
  3. Place eggs into a large mixing bowl, use an electric mixer to whisk the eggs on medium speed (30 seconds). Gradually add into sugar and beat on high speed until the eggs have tripled in volume. This takes about 5 minutes.
  4. Gently fold in the sifted flour into the beaten eggs until you can’t see flour anymore, then fold in the butter, milk and vanilla essence in the batter.
  5. Now pour batter into a lined cupcake pan. I use a level ice cream scoop for even measuring. Fill liners to about 2/3 full (do not over-fill).
  6. Place the cupcake pan into the middle rack of the oven. Bake for 15-16 minutes. You can insert a toothpick into the center of the cake. The cupcake is done if the toothpick comes out clean.
  7. Remove the pan from oven and place it on the cooling rack for about 10 minutes. Once the cupcakes are cooled to room temperature, then you can start the frosting and decoration. Click here for Buttercream Frosting recipe. 

Homemade Chinese Rice Wine 蔡妈妈家酿糯米酒jiā niàng nuò mǐ jiǔ

photo-16-2-17-4-33-11-pm-1

The simplest kind of homemade rice wine, this  gentle, sweet-sour, marvelously aromatic liquor is a common flavoring for all kinds of  China regional cuisines. You can find the rice wine (sometimes called Chinese Cooking Wine) in the Asian supermarkets, but the homemade version is much more delicious. No preservative is added. It keeps for ages in the fridge.

Yields 1.5 – 2 litres of Rice Wine

 Ingredients

  • 1800g           White Glutinous Rice白糯米
  • 20-25g          Wine Yeast 酒曲or酒药 (It is available in a little white ball about an inch in diameter or a biscuit and can be spotted in clear package in the Asian grocery markets. A simple recipe is sometimes written in the package.)
  • Water
  • 50g       Vodka (optional)
  • photo-14-2-17-9-09-04-am-1

Equipment

  • A big mixing bowl
  • A colander 漏勺/滤锅
  • Parchment paper (烘培纸) or cheesecloth or 棉纱布
  • A 6-quart airtight container
  • A steamer  蒸锅              photo-14-2-17-9-13-50-am-1              

Method

  1. Sanitation is very important. Make sure all the equipments and your hands are well cleaned and air dry. Everything that touches the rice at every stage must be absolutely clean. If there is even a whisper of oil or contamination anywhere along the way, the whole batch could go bad in an instant.
  2. Rinse the glutinous rice in running water till water becomes clear. Soak the rice in the clean room-temperature water for at least 3 hours. (No need to cover.) Drain.img_7671
  3. Place parchment paper (or a clean wet cheesecloth) in the basket of the steamer. Add into the rice. Use chopsticks to gently stir to loosen the rice. This would help water steam go through for a fast and even cooking in the process followed.img_7672
  4. Cook over high heat for 25 minutes after the water starts boiling. In the middle of the process, insert chopsticks in the rice and move up and down for a couple of times. This step helps loosen the rice for the same reason mentioned in the step #5. The rice shall become sticky and translucent if it is properly cooked. Move the rice to a colander. Rinse in the running water to cool it off. Be very careful as the rice is quite hot. Drain.img_7673
  5. Use a rolling pin to break down the wine yeast to make it almost powder. Move the rice into an airtight bowl by batches. Sprinkle the wine yeast powder on top of each batch of the cooked rice. Gently pat and press down the rice to tighten the mix in the container.photo-16-2-17-10-41-29-pm-1
  6. Add a 250 gram lukewarm water (in 35℃)  in a clean bowl, form a well of 7-8cm in diameter in the center of the rice, rinse your hands in the water to make sure no yeast left in your hands. Then pour all the water into the well.img_7675
  7. Cover the container. Seal it with cling film or plastic bag.photo-16-2-17-10-43-16-pm-1
  8. Keeping the mix WARM for 2-3 days is also very important. You can even wrap the container with a kitchen towel or a bath towel. Place the container in a place undisturbed with ideal room temperature of 28-30℃. In 24 hour later, you have the option of opening the cover and pour into 50g Vodka on top of the rice. Then cover and re-wrap the container again.  The alcohol helps prolong shelve life of the fina product of your rice wine. You can leave the bottled wine on the shelve of your pantry for many months. You have the option of not storing it in the fridge.
  9. In 48 hours or so later, uncover the container. The mass of fermented rice shall float on top of the wine. Use a really clean spoon to gently press down the fermented rice. You should see wine comes out on the top of the container. Taste the wine. It should be sweet and alcoholic. Rice wine is successfully done now. Or let the mix ferment for another day until you like the balance of the flavors. Then refrigerate. It will keep for many months. But I doubt that it will be hanging around that long once you try it.photo-16-2-17-10-50-16-pm-1

Easy and Fresh Tomato Pasta Sauce 番茄意面酱

Photo 10-2-17, 7 12 12 PM
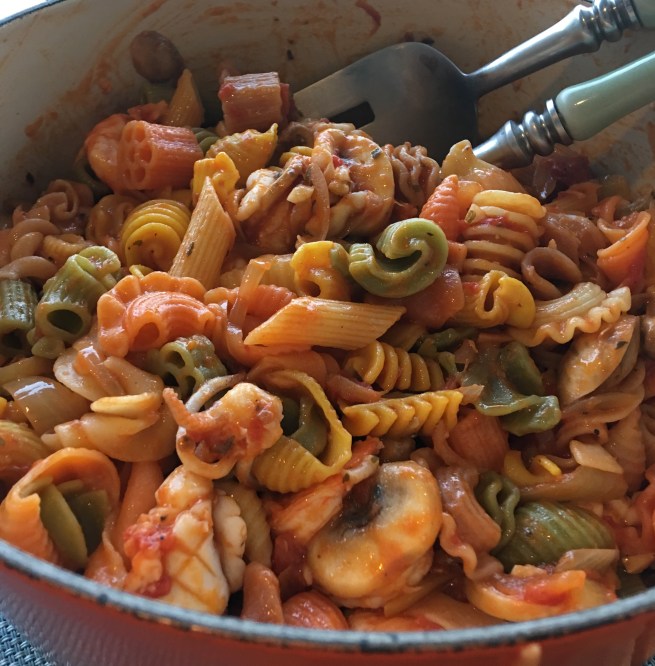
Once you’ve cooked it at home, your family will not want to have bottled tomato sauce from supermarket any more. The flavor of the sauce is so delicate and fresh. Only four humble ingredients are involved and are probably already available in your pantry.

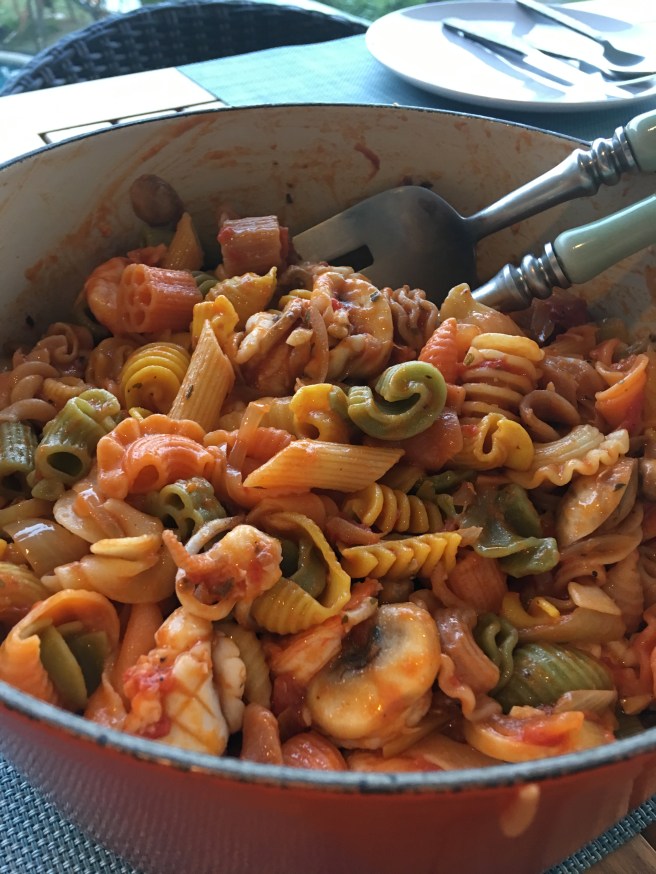
For a hearty dinner, you may add into the sauce any of pre-cooked vegetables (asparagus, peas, green beans etc.), seafood or small chunks of sausage. A standard Italian rule of thumb is 80-100 grams dried pasta per person. Also you can make larger quantities of the sauce and store it in the fridge for up to a week.

Serves 4-6, (makes enough sauce for 400 grams of dried pasta.)

Adapted from Marcella Hazan’s Essentials of Italian Cooking

  • I can                     canned plum tomatoes (net weight 400grams)
  • 70grams             unsalted butter
  • 1                             large yellow onion (about 200g), peeled and thinly sliced
  • 1 teaspoon    kosher salt 粗海盐
  • 20g                   Grated parmesan cheese or packaged shredded Italian cheese (optional)
  • 1-2 g                 dried mixed Italian herbs (optional)

Method

  1. Combine the tomatoes, their juices, the butter, the sliced onions and 1 teaspoon of the salt in a saucepan.photo-12-2-17-5-53-36-pm
  2. Place the saucepan over medium heat for a few minutes to bring to a simmer. Turn to low heat and cook for about 40 minutes. Leave the pan UNCOVERED. Stir with a wooden spatula occasionally to keep the sauce from stick to the bottom of the pan, mashing any large pieces of tomato with the spatula. Taste the sauce. Add salt as needed.
  3. Cook your pasta al dente (which means pasta is cooked to be firm to the bite. Some pasta boxes have directions for al dente). Scoop a spoon of pasta water into the sauce pan and mix it well to dilute the tomato sauce. photo-12-2-17-5-54-56-pm
  4. Add the pasta into the sauce pan. Mix well. You may add any of pre-cooked vegetables (asparagus, peas, green beans etc.), seafood or small chunks of sausage.
  5. Enjoy. photo-10-2-17-7-12-12-pm