Rainbow Dash Cupcakes 云宝纸杯蛋糕

you can’t have a party without a cake and kids need something fun to do at the party. Why not find a way to combine the two and save some money? Bake the cupcakes by yourself then let the kids decorate and create their own cupcakes.

Makes about 24 cupcakes,

  • 250g          cake flour 低筋面粉 (all-purpose or plain flour works. it just doesn’t produce a cupcake as soft as cake flour)
  • ½ teaspoon    salt
  • 2 teaspoons    baking powder 泡打粉
  • 4-5 large eggs   room temperature
  • 200g          caster sugar白砂糖
  • 200g          unsalted butter (melted)
  • 2 tablespoons   whole milk, room temperature 全脂牛奶 (室温)
  • 1 teaspoon     vanilla essence (optional)

Method

  1. Preheat the oven to 190℃ or375°F.  Line a cupcake/muffin pan with cupcake liners. In the meantime, melt the unsalted butter in microwave or on the stove and cool it off.
  2. In a medium bowl, whisk together cake flour, baking powder and salt. Set flour mix aside.
  3. Place eggs into a large mixing bowl, use an electric mixer to whisk the eggs on medium speed (30 seconds). Gradually add into sugar and beat on high speed until the eggs have tripled in volume. This takes about 5 minutes.
  4. Gently fold in the sifted flour into the beaten eggs until you can’t see flour anymore, then fold in the butter, milk and vanilla essence in the batter.
  5. Now pour batter into a lined cupcake pan. I use a level ice cream scoop for even measuring. Fill liners to about 2/3 full (do not over-fill).
  6. Place the cupcake pan into the middle rack of the oven. Bake for 15-16 minutes. You can insert a toothpick into the center of the cake. The cupcake is done if the toothpick comes out clean.
  7. Remove the pan from oven and place it on the cooling rack for about 10 minutes. Once the cupcakes are cooled to room temperature, then you can start the frosting and decoration. Click here for Buttercream Frosting recipe. 

Homemade Chinese Rice Wine 蔡妈妈家酿糯米酒jiā niàng nuò mǐ jiǔ

photo-16-2-17-4-33-11-pm-1

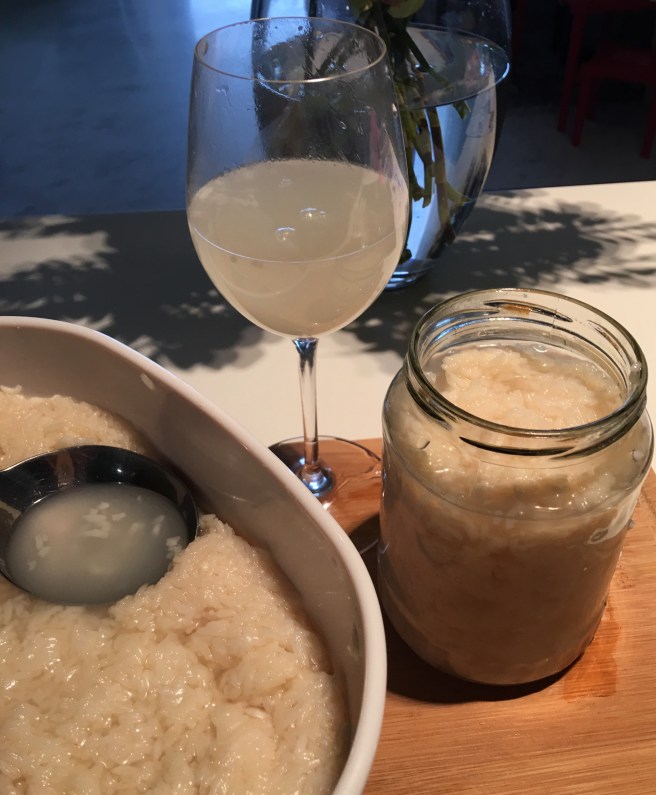
The simplest kind of homemade rice wine, this  gentle, sweet-sour, marvelously aromatic liquor is a common flavoring for all kinds of  China regional cuisines. You can find the rice wine (sometimes called Chinese Cooking Wine) in the Asian supermarkets, but the homemade version is much more delicious. No preservative is added. It keeps for ages in the fridge.

Yields 1.5 – 2 litres of Rice Wine

 Ingredients

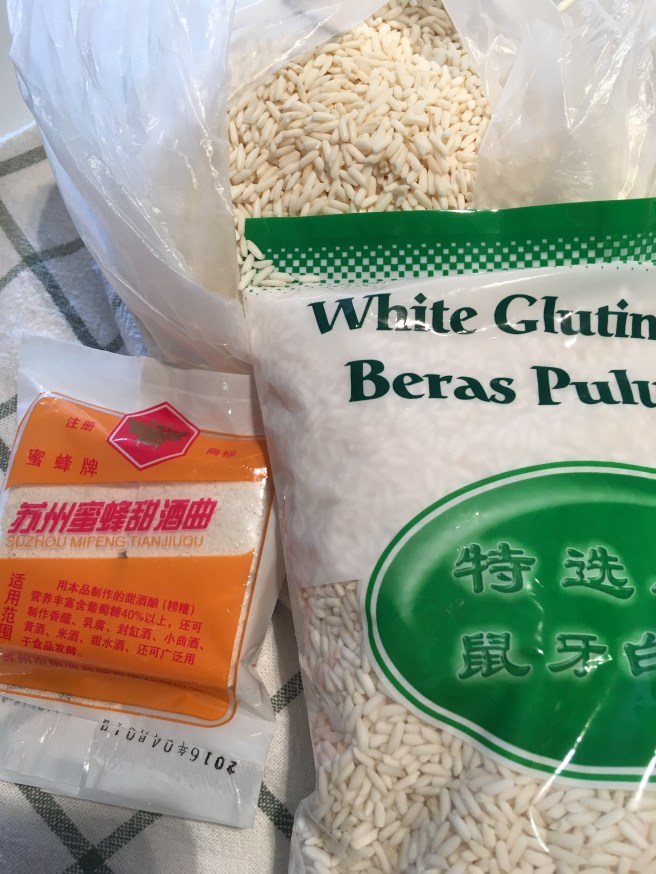
  • 1800g           White Glutinous Rice白糯米
  • 20-25g          Wine Yeast 酒曲or酒药 (It is available in a little white ball about an inch in diameter or a biscuit and can be spotted in clear package in the Asian grocery markets. A simple recipe is sometimes written in the package.)
  • Water
  • 50g       Vodka (optional)
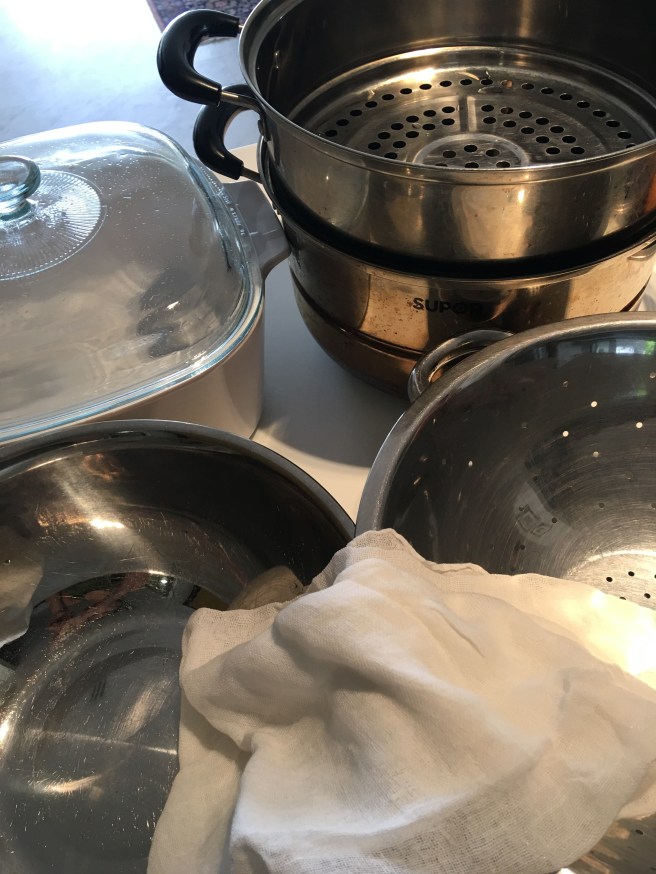
  • photo-14-2-17-9-09-04-am-1

Equipment

  • A big mixing bowl
  • A colander 漏勺/滤锅
  • Parchment paper (烘培纸) or cheesecloth or 棉纱布
  • A 6-quart airtight container
  • A steamer  蒸锅              photo-14-2-17-9-13-50-am-1              

Method

  1. Sanitation is very important. Make sure all the equipments and your hands are well cleaned and air dry. Everything that touches the rice at every stage must be absolutely clean. If there is even a whisper of oil or contamination anywhere along the way, the whole batch could go bad in an instant.
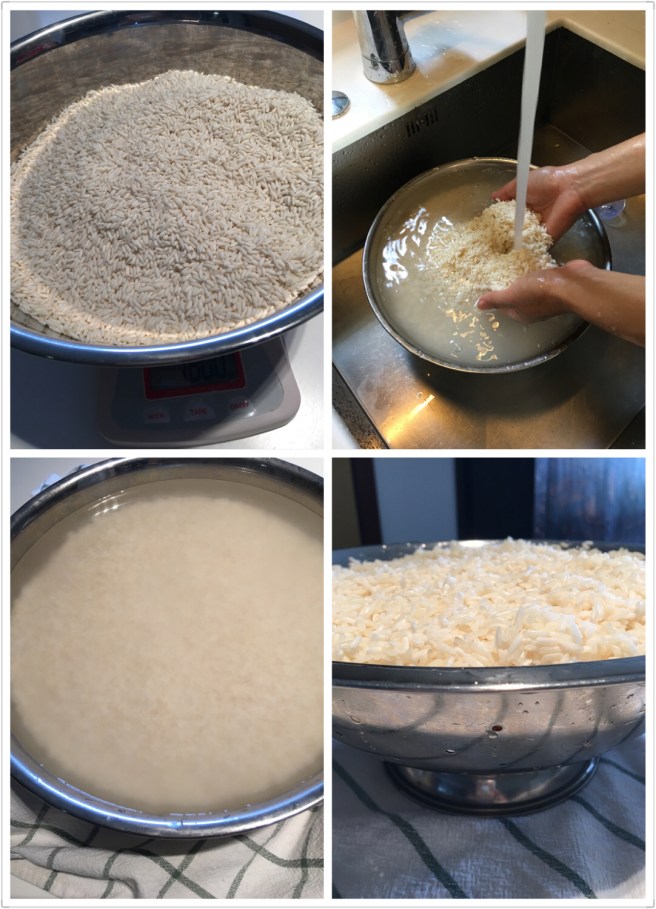
  2. Rinse the glutinous rice in running water till water becomes clear. Soak the rice in the clean room-temperature water for at least 3 hours. (No need to cover.) Drain.img_7671
  3. Place parchment paper (or a clean wet cheesecloth) in the basket of the steamer. Add into the rice. Use chopsticks to gently stir to loosen the rice. This would help water steam go through for a fast and even cooking in the process followed.img_7672
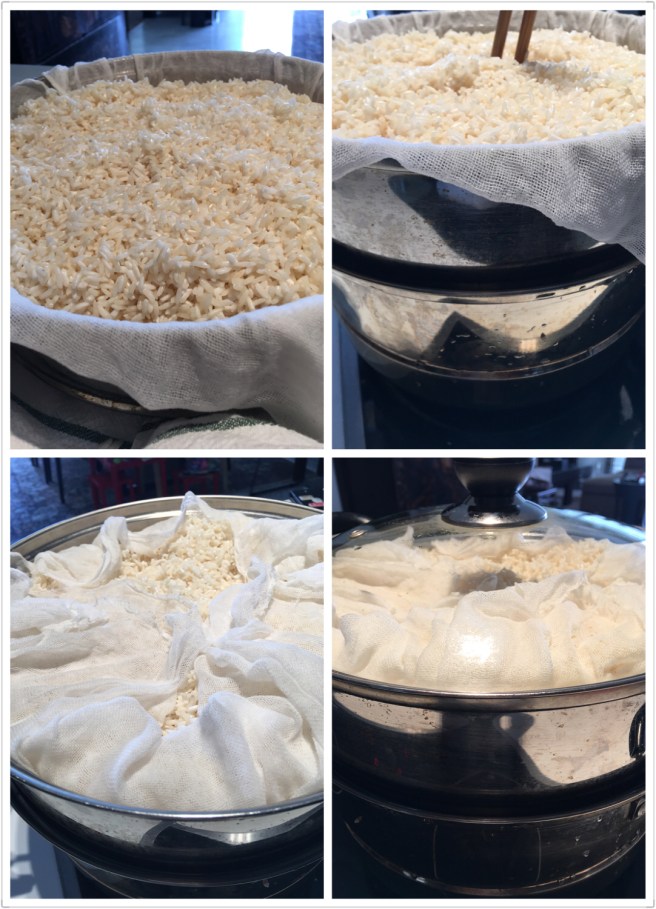
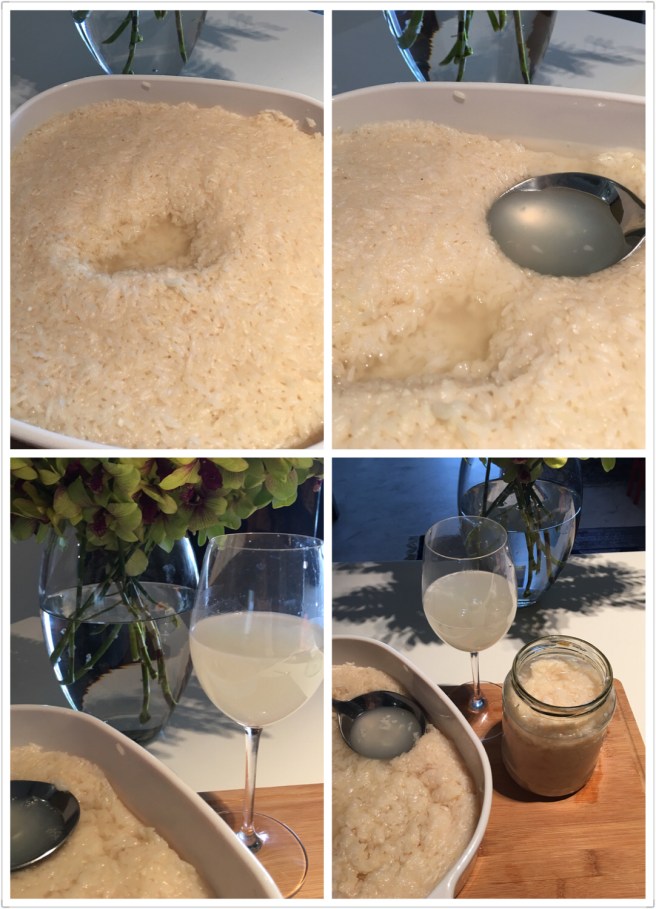
  4. Cook over high heat for 25 minutes after the water starts boiling. In the middle of the process, insert chopsticks in the rice and move up and down for a couple of times. This step helps loosen the rice for the same reason mentioned in the step #5. The rice shall become sticky and translucent if it is properly cooked. Move the rice to a colander. Rinse in the running water to cool it off. Be very careful as the rice is quite hot. Drain.img_7673
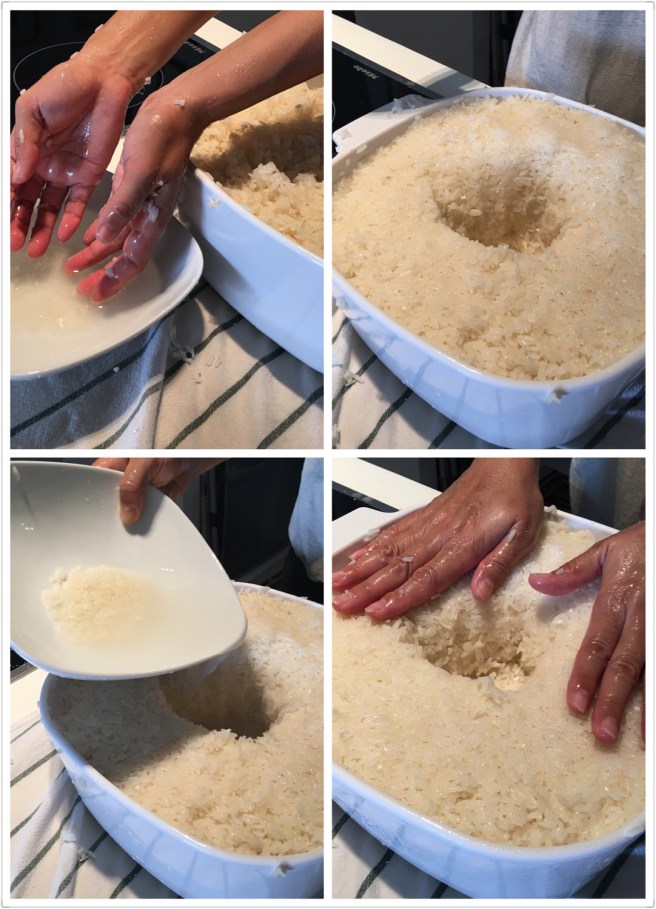
  5. Use a rolling pin to break down the wine yeast to make it almost powder. Move the rice into an airtight bowl by batches. Sprinkle the wine yeast powder on top of each batch of the cooked rice. Gently pat and press down the rice to tighten the mix in the container.photo-16-2-17-10-41-29-pm-1
  6. Add a 250 gram lukewarm water (in 35℃)  in a clean bowl, form a well of 7-8cm in diameter in the center of the rice, rinse your hands in the water to make sure no yeast left in your hands. Then pour all the water into the well.img_7675
  7. Cover the container. Seal it with cling film or plastic bag.photo-16-2-17-10-43-16-pm-1
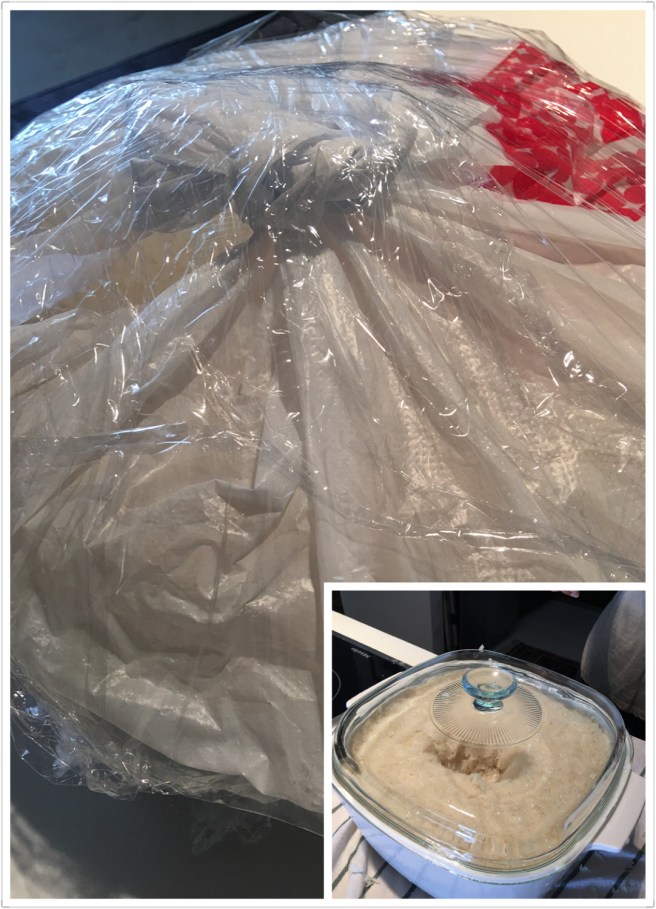
  8. Keeping the mix WARM for 2-3 days is also very important. You can even wrap the container with a kitchen towel or a bath towel. Place the container in a place undisturbed with ideal room temperature of 28-30℃. In 24 hour later, you have the option of opening the cover and pour into 50g Vodka on top of the rice. Then cover and re-wrap the container again.  The alcohol helps prolong shelve life of the fina product of your rice wine. You can leave the bottled wine on the shelve of your pantry for many months. You have the option of not storing it in the fridge.
  9. In 48 hours or so later, uncover the container. The mass of fermented rice shall float on top of the wine. Use a really clean spoon to gently press down the fermented rice. You should see wine comes out on the top of the container. Taste the wine. It should be sweet and alcoholic. Rice wine is successfully done now. Or let the mix ferment for another day until you like the balance of the flavors. Then refrigerate. It will keep for many months. But I doubt that it will be hanging around that long once you try it.photo-16-2-17-10-50-16-pm-1

Sticky Rice Siu Mai 糯米烧麦

photo-14-2-17-6-47-48-pm

These dumplings are so easy. You don’t even need to fold them.

Yields about 30-35 sticky rice Siu Mai

Fillings

  • 150g                          white glutinous (sticky) rice白糯米, cooked
  • 100g                          bamboo shoots, minced, 冬笋切小丁
  • 200g                           ham, ground pork or any cured meat, minced and cooked,  火腿、腊肉、腊肠以及猪肉馅任何一种,剁碎
  • 80g                          dried shiitake mushroom (soaked with hot water), 香菇泡发再切碎
  • 80g                            egg skin, 蛋皮 (optional), minced
  • 10g                             ginger, minced, 姜末
  • 15g                              spring onions, minced, 香葱切碎
  • 2 tablespoons          cooking oil
  • ½ teaspoon             salt
  • 1 teaspoon                 light soy sauce生抽酱油
  • 1 teaspoon                 sesame oil

Wrappers

  • 300g    plain flour or all purpose flour  中筋面粉
  • 90g     hot water (in 80℃)
  • 90g     water in room temperature

Method 

  1. Soak the glutinous rice with clean water for 2-3 hours. Move out and drain. Place parchment paper in a steamer basket, transfer rice into the basket and steam for around 20 minutes until the rice is almost transparent. Rinse the cooked rice in a running water to cool it off. This process also helps keep the rice from sticking to each other.photo-14-2-17-10-42-52-pm
  2. While rice is steaming, start making wrappers. Place the plain four in a mixing bowl, gradually add 90g hot water and mix by using chopsticks. Then add the 90g room temperature water, use your hand to mix the dough well. Knead the dough for about 5 minutes till it becomes smooth. Cover the mixing bowl with cling film or a plastic bag. Let the dough rest for 30 minutes.Photo 14-2-17, 10 44 18 PM.jpg
  3. Now continue working on the fillings. Heat up the cooking oil on a wok or a pan, over medium heat, fry the ginger for one minute, add any of your meat options (ham, ground pork or cured meat) and cook for another 1 minute. Add bamboo shoots and cook for 2 more minutes. Add into salt, soy sauce and sesame oil. Now place the sticky rice in the wok and mix well. Stir well to keep the rice from sticking to the bottom of the wok. Add spring onions right before you turn off the heat. Does it look like we are making ‘fried rice’? Yes, it does! Remove the ‘fried rice’ from wok and place it in a bowl.photo-14-2-17-10-45-44-pmphoto-14-2-17-10-46-27-pm
  4. Now let’s make the wrappers. Divide the dough into 3 equal pieces. Pick one piece and cut it into 10-12 pieces. Simply use your hand to pick up each piece and pound in into the floured surface to make a small disc. Then use a rolling pin to smooth out each disc until it’s about 10cm in diameter with edges thinner than the center.photo-14-2-17-10-47-38-pm
  5. Now let’s assemble. Place 1 tablespoon of the fillings in the center of a wrapper. Use your big thumb to press down the filling. Gather up the wrapper around the filling, pleating it as you go to form an open-topped pouch. Carefully squeeze the sides of the dumpling about half way up to give the dumpling a ‘waist’. Repeat with the remaining dumplings.photo-14-2-17-10-48-59-pmphoto-14-2-17-10-52-09-pm
  6. Pour enough water into a steamer and bring to a boil. Place the parchment paper in the steamer basket. Place as many dumplings as you can. Leave a little space between the dumplings. Steam over high heat for about 10-15 minutes. Serve with soy sauce and/or chili oil.photo-14-2-17-11-00-04-pm