Crispy Fried Sesame Ball麻团má tuán

coverSesame balls are one of the most popular desserts in China and some Southeast Asia countries. Street vendors sell them and you can also get them at dim sum restaurants. It is a quite challenging Chinese recipe though. The problem comes during deep-frying – the sesame balls need to be turned continually to expand and become center-hollowed. You just need practice to skillfully manoeuvre the balls in the hot oil.

Yields 12 sesame balls,

  • Make the dough

150g    glutinous rice flour糯米

45g     caster sugar 白糖

110g    water (bring it to a boil)

½ tablespoon  cooking oil

  • 30g      white sesame seeds
  • cooking oil for deep dryingIMG_0877.jpeg

Method

  1. Place glutinous rice flour in a mixing bowl.IMG_0881.jpeg
  2. Bring the water to a boil. Resolve the sugar in the hot water. Pour the hot sugar syrup into the glutinous flour, stir and mix well.IMG_0910.JPG
  3. Add in ½ tablespoon of oil, knead until smooth and shiny dough is formed. Wrap with cling wrap and set aside for 10 minutes.IMG_0911.JPG
  4. Divide dough into 12 portions (25 g each), roll dough into ball shape, cover with cling wrap.IMG_0890.jpeg
  5. Coat generously with sesame seeds, press gently so that sesame seeds can stick firmly on the surface.IMG_0912.JPG
  6. Drop the sesame balls into oil when the oil starts to heat up, about 120°C to 130°C. Use medium-low heat to avoid burning. In 3 minutes or so, the balls will start float up to the surface.IMG_0897.jpeg
  7. Stir and gently press down with a slotted spoon while frying, sesame balls will expand in size. The secret is to gently press until the balls expand, crispy crust will form around the chewy and hollow center. Repeat the ‘pressing down’ in 3 or 4 times. In the meantime, use slotted spoon gently moving around the balls to ensure they are evenly cooked. Deep fried to golden perfection – this step takes about 15-20 minutes.
  8. Ready to serve. This dessert is better served while it’s still hot and it’s not suitable for storing in the fridge. Ideally, eat it as soon as possible for the best taste.


Pandan Chiffon Cake 班兰戚风蛋糕bān lán qī fēng dàn gāo

IMG_5197.JPGThe celebrity chef Nigel Lawson was quoted that Pandan leaves are the next big food craze in the US and UK. This unique Southeast Asia plant, which are found in the backyards of many Malaysian homes, has a sweet fragrance that is likened to vanilla. Its extracted juices are the natural food colouring that is commonly used in some popular Southeast Asia desserts. It is also an essential ingredient for making the famous Singapore Chicken Rice.

 Makes one cake (use 25cm cake tin),

 For batter,  

  • 6                                  egg yolks (use very fresh egg weighting at 60g each, room temperature) 蛋黄
    100g                 caster sugar 白砂糖
    2 tablespoons     pandan juice (freshly made from pandan leaves + 4 tablespoons water)新鲜班兰汁
    1 teaspoon         vanilla essence 香草香精
    1 teaspoon         pandan essence斑兰香精
  • 115ml               sunflower oil (canola oil or corn oil is good too)植物烹调油
    140ml               coconut milk 椰奶
    200g                 cake flour 低筋面粉
    2 teaspoons        baking powder 泡打粉
    1/4 teaspoon      salt

For meringue 蛋白糖霜,

  • 9                                  egg whites (use very fresh egg weighting at 60g each, room temperature) 蛋白
    100g                 caster sugar 白砂糖
    1 teaspoon    cream of tartar 塔塔粉IMG_3400.JPG

Method

  1. Preheat the oven to 170℃. I use an oven thermometer to make sure to get the exact temperature. Use oven function of ‘Fan Plus’. Place the rack in the lowest level of your oven.IMG_3500.JPG
  2. First let’s make the pandan juice. Pandan leaf is not a juicy plant. To ‘squeeze’ the juice as much as you can, thinly cut the leaves then add them in the food processor with 4 tablespoons of water. After it comes a paste, place in a cheese cloth. Then squeeze the juice out in a bowl.IMG_3455.JPG
  3. Now let us cream the egg yolk. Place egg yolks into a large mixing bowl, use an electric mixer to whisk the yolks on medium speed (30 seconds). Gradually add into sugar and beat on high speed until the eggs have tripled in volume resulting a nice and light batter. This takes about 5 minutes.IMG_3456.JPG
  4. Add into wet ingredients Mix into the corn oil, coconut milk, pandan paste, vanilla essence. Sift into the dry ingredients of cake flour, salt and baking powder. Gently fold them into the beaten eggs until you can’t see flour anymore.IMG_3459.JPG
  5. Now let’s make meringue. Use an electric mixer, beat the egg whites over medium speed for one minute. Then add Cream of Tartar and whisk for one more minute. Then gradually add the sugar and beat over high speed for about 5 minutes.IMG_3460.JPG
  6. Now that the batter and meringue is done, It is time to mix them both together. Add one third of the meringue to the batter and mix it with a spatula so that you get a light green batter which is easy to fold. Then add the rest of the meringue to the batter and GENTLY fold the mixture in.IMG_3462.JPG
  7. Before you pour the mixture into the tin, give your batter bowl a few sharp blows by banging it on the table. This will get the big bubbles to rise to the top and burst.IMG_3437.JPG
  8. Now pour the mixture into the cake tin slowly making sure that as many of the big bubbles burst while the batter flows over the rim of the cake tin. Remember pouring the batter into the same portion of the tin and you will see that the batter flows around the tin without trapping more air.IMG_3463.JPG
  9. Now put the cake into the oven. Make sure that the oven thermometer shows 170 °C and put the cake tin as lowest in the oven as you can. It is critical to have more heat at the bottom than the top or else the top will brown, crack, become dry and start to sink before your baking is done. At around 15 to 20 minutes, you cake would have risen and start to crack. The entire baking time takes about 55 minutes.IMG_3464.JPG
  10. Once baking is done, overturn the cake and let it cool. Use a funnel to elevate the cake. This is important because if the cake is too close to your tabletop, condensation takes place and you will spoil the surface of the cake. To speed up the cooling process, you can drape a wet towel over the cake tin. This takes about 60 minutes. Once your cake is cooled, it’s time to remove it from the tin.FullSizeRender.jpg
  11. Use a sharp knife and with one movement separate the sides of the cake from the tin, pressing your blade as firm as possible on the cake tin.IMG_3493.JPG

IMG_3492.JPG


Pineapple Tarts 黄梨塔huáng lí tǎ

photo-11-1-17-3-17-20-pmIt is the time of the Year! With the Chinese New Year around the corner, you can find pineapple tarts just about everywhere in Singapore or Malaysia . Every bakery that churns them out is claiming that it’s tarts are the best. But I found out today these melt-in-mouth homemade tarts with buttery crumbly pastry and fresh homemade pineapple jam are the BEST I’ve had so far. It calls for simple and fresh ingredients with minimized use of sugar. No preservatives added at all.

 Makes 100 pieces  

Wrappers

  • 510g                      plain flour/all purpose flour 中筋面粉
  • 350g          unsalted butter
  • 100g                      condensed milk 炼乳
  • 2 egg yolks   room temperature

Homemade pineapple filling (pineapple jam)

  • 3       ripe pineapples
  • 250g      granulated sugar 白砂糖

Method

Step 1  make pineapple filling/jam

  1. Peel the pineapples. Cut away some of the core but not totally remove it (By leaving small part of core so the jam has some bites in.) Cut into small cubes.
  2. Put 1/4 of the pineapples into a blender till it becomes puree (do not add water). Do the same with the rest of pineapple cubes.
  3. Sift the pineapple puree so to remove some of the juices. Don’t throw the juices away – the byproduct makes a couple of glasses of good fruit juice.photo-11-1-17-6-19-32-pm
  4. Cook sifted the pineapple puree in a wok or sauce pan over medium heat for about 10 minutes till juice almost evaporates.
  5. Now add in sugar. The mixture will turn watery again after sugar added. Continue stirring with a wooden spoon for about 15 minutes till it becomes a thick paste.
  6. Reduce the heat to low and cook for about 60 minutes. Stir from time to time to avoid burning.
  7. Scoop out the pineapple jam into to bowl and let it cool completely. Scoop a small portion (10g) and use your hand to shape it into a ball. If you find it is too watery to difficult to make it into a ball, just place the jam the fridge for a few hours then try again.Photo 11-1-17, 9 39 22 PM.jpg

 Step 2   make the wrappers

  1. Sift the flour. 面粉过筛
  2. Cut the butter into small cubes. Use your fingertips to rub butter in the flour till the mixture resembles bread crumb.
  3. Add into the mixture the egg yolks and condensed milk. Use your hand to combine them together till it becomes a soft dough. Wrap the dough in cling wrap and leave it in the fridge for 20 minutes.Photo 11-1-17, 9 41 01 PM.jpg

Step 3   Assemble

  1. Divide the pineapple filling/jam into 100 portions (8g each) and roll them into a small ball
  2. Roll the dough into 100 portions balls (10g each) and roll them into a small ball
  3. Flatten a piece of the dough ball, place a pineapple jam ball in the middle. Bring the edges together and press tightly to seal. Roll it in between your palms to shape it into a ball.
  4. Use a paring knife, cut the criss-cross shape on the top to create pineapple pattern. Or use any fun or desired small-size cookie cutter or pastry cutter that you happen to have at home.Photo 11-1-17, 6 21 24 PM.jpg
  5. Place all the little pastries on a baking tray lined with parchment paper.
  6. Apply egg wash with a brush. Try to brush the entire pastry ball including top and sides.
  7. Preheat the oven to 165℃. Place the baking try in the upper deck of the oven. Bake for 24 minutes or till they become golden brown.Photo 11-1-17, 9 54 22 PM.jpg
  8. Cool completely before enjoying.Photo 11-1-17, 9 53 19 PM.jpg

Clay Pot Rice煲仔饭bāo zǎi fàn

IMG_0689.JPG
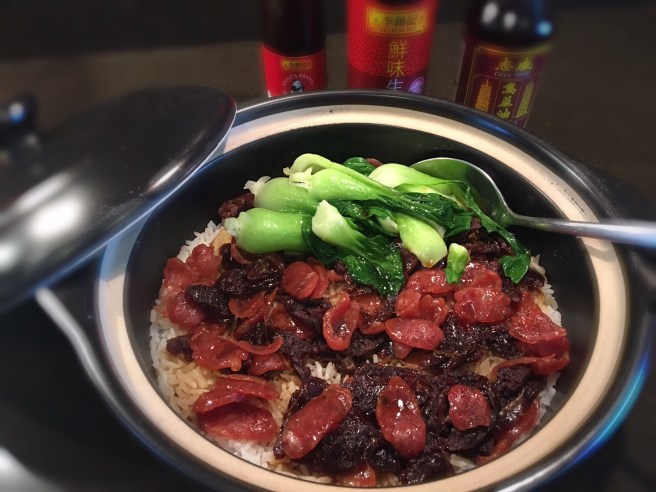
It is a traditional Cantonese dish but now becoming popular throughout China. The rice is slowly cooked in a clay pot, giving the dish a distinctive flavor. It is typically served with Cantonese-style cured pork and vegetables. A perfectly cooked clay pot rice has a great flavor of all the ingredients, with nicely crisped and scorched rice on the bottom of the pot.

Serves 4-6,

  • 2 cups Thai Jasmine rice泰国香米
  • 2 cups and 2 tablespoons plain water in room temperature
  • 4 Cantonese-style sausage广式香肠
  • 2 slices ginger姜片
  • 1 tablespoon cooking oil

Sauce

  • 4 tablespoons light soy sauce生抽
  • 2 tablespoons oyster sauce蚝油
  • 1/2 teaspoon caster sugar 白糖
  • 1 tablespoon sesame oil香油

Serving with

2 Bok Choy青菜

4 green onions, chopped (optional)

IMG_0627

 Method

  1. Rinse the rice carefully and then soak with clean water (2 cups and 2 tablespoons) for around 15 minutes.IMG_0628.JPG
  2. In the meantime, slice the sausage into thin slices.IMG_0629.JPG
  3. Bring the pot to a boil, turn to the low-medium heat and continue to cook the rice for 2 to 3 minutes.
  4. Remove the lid, add ginger slices firstly and then top with sausage slices. Drizzle oil over the edges. Cover the pot. Turn to low heat and cook the rice for 30 minutes.IMG_0691.JPG
  5. In the meantime, blanch the bok choy in a pot of boiled water. Drain and set aside. Let’s also make the sauce. Get a clean bowl, add into all sauce ingredients. Mix well.

6. Remove the lid of the pot. Place onto the bok choy. Sprinkle all the sauce evenly over the top of the pot.

7. Use a big spoon to stir everything together to make sure all grains of rice are nicely coated with sauce. Do not miss those beautifully crisped rice on the bottom of the pot!IMG_0682.JPG